Continue to Site

Menu Boards

URNUTS

New member
Opening soon.
I didn’t plan on a menu board and think that may be a mistake.
Not doing anything crazy like digital but would not mind blowing up portions of the menu, having them mounted on boards, etc.
Suggestions on that direction?
Not sure who does that… Graphics shop, Staples, etc?
 
Last edited:
Why not digital? It’s not crazy & can be done without breaking the bank IMO.
 
Last edited:
From what I gathered about your store chalk board sounds more inline with how you made it sound
 
Last edited:
Opening soon.
I didn’t plan on a menu board and think that may be a mistake.
Not doing anything crazy like digital but would not mind blowing up portions of the menu, having them mounted on boards, etc.
Suggestions on that direction?
Not sure who does that… Graphics shop, Staples, etc?
If you were interested in digital menus, with couple hundred bucks you could get decent size TV’s. Doesn’t have to be smart or anything fancy.
Then you could get an amazon fire tv box (1 per tv) to use as media players, and set it up for free at digitalsignage.com.
So with lets say $250 - $300 per tv (x4 = $1200), $80 per media player (x4 = $320), and $50 for brackets per tv (x4 = $200), you could have a digital menu board setup of 4 tvs with less than $2000.

I can even help you thru some basic steps to get setup if you want too.
Feel free to ask if you have any questions!

Happy new year 🙂
 
Last edited:
48.png

If you were interested in digital menus, with couple hundred bucks you could get decent size TV’s. Doesn’t have to be smart or anything fancy.
Then you could get an amazon fire tv box (1 per tv) to use as media players, and set it up for free at digitalsignage.com.
So with lets say $250 - $300 per tv (x4 = $1200), $80 per media player (x4 = $320), and $50 for brackets per tv (x4 = $200), you could have a digital menu board setup of 4 tvs with less than $2000.

I can even help you thru some basic steps to get setup if you want too.
Feel free to ask if you have any questions!

Happy new year 🙂
OR…simply design your content using PowerPoint (loop it), convert the file(s) to MP4 onto a flash drive & plug it into your TV? Get Coke/Pepsi to buy it, in exchange for featuring their products you’re offering. Add a few slides supporting the local school athletic teams, etc. Sell ad space on it. It also gives people something to occupy their minds while waiting in line, other than thinking about how long it’s taking to place their order.
 
Last edited:
OR…simply design your content using PowerPoint (loop it), convert the file(s) to MP4 onto a flash drive & plug it into your TV? Get Coke/Pepsi to buy it, in exchange for featuring their products you’re offering. Add a few slides supporting the local school athletic teams, etc. Sell ad space on it. It also gives people something to occupy their minds while waiting in line, other than thinking about how long it’s taking to place their order.
That’s a good idea, but unfortunately won’t work unless the TVs are “smart” enough to support mp4 playback thru USB. Plus, a looped PowerPoint file won’t be a looped mp4 file after the conversion. You could use Photoshop to create the template for each TV and the menu, (PowerPoint will have no resolution at all), or use Google Sheets for the menu itself, so you can update it as needed, without having to create new menus every time you want to change prices. With Google Sheets you can even change the prices using your phone, though I’m not sure if it’s available with the free version.

As for Coke/Pepsi, that is true. If you have a contract with them you can ask them to pay for it and in most cases they will!

A while back (about 3 years), we’ve used Google Sheets to combine the menu changes between Aldelo POS, Online Ordering and Digital Menus and it worked great back then.

Here are a few samples of what you can do for menus using Photoshop and a free digitalsignage.com account:

  • []Sample 1
    [
    ]Sample 2
    []Sample 3
    [
    ]Sample 4
Either way, good luck in your search. 🙂
 
Last edited:
December is on the money… not a digital place- at all. Would almost look out of place and completely not the vibe I am after.
I am grateful for the thoughts, though!
If you saw the place, you’d say “Oh, OK… I got it”
 
Last edited:
We’ll see.
Fire up the oven tomorrow hopefully.
POS here tomorrow, as well… that’s pretty much it- then a final cleaning and inspections.
 
Last edited:
we bought some large frames from ikea and had kinkos to architectural drafting size print outs of our menu. printing cost 6 bucks a sheet and frames were 15 each worked out well for us.
 
Last edited:
Thanks- that’s pretty much just what I was thinking. Have a really small menu- pizzas, paninis and salads. One crust, 2 sizes, 6 salads and 8 paninis… and that’s pretty much it!
 
Last edited:
We’ll see.
Fire up the oven tomorrow hopefully.
POS here tomorrow, as well… that’s pretty much it- then a final cleaning and inspections.
Good luck. Hope you’re off to a good start!
 
Last edited:
48.png

If you were interested in digital menus, with couple hundred bucks you could get decent size TV’s. Doesn’t have to be smart or anything fancy.
Then you could get an amazon fire tv box (1 per tv) to use as media players, and set it up for free at digitalsignage.com.
So with lets say $250 - $300 per tv (x4 = $1200), $80 per media player (x4 = $320), and $50 for brackets per tv (x4 = $200), you could have a digital menu board setup of 4 tvs with less than $2000.

I can even help you thru some basic steps to get setup if you want too.
Feel free to ask if you have any questions!

Happy new year 🙂
Hey Steve,
I have 2 TVs and 2 apple TVs. Any thoughts on how I can use them to show my menu on one and pics and video on the other?

Thanks!
 
Last edited:
Hey Steve,
I have 2 TVs and 2 apple TVs. Any thoughts on how I can use them to show my menu on one and pics and video on the other?

Thanks!
Hi there 🙂
I doubt that your menu can fit in one TV, not even two are TVs are enough in most cases. Unless you want to display parts of the menu at a time which will be rotating.
This option however, could be really annoying for your customers as they’re trying to read a constantly rotating menu.

I haven’t worked with apple TV to know any specific details but I think that DigitalSignage.com has a player for iOS too so it might work. But I can’t provide you with any details or help for apple since I have no previous experience with it. If you do amazon fire tv on the other hand, then I can tell you everything you need to know.
 
Last edited:
Thanks Steve. So, if I do buy Amazon fire tv, how would i go about setting it up. Thanks~
 
Last edited:
Thanks Steve. So, if I do buy Amazon fire tv, how would i go about setting it up. Thanks~
This is gonna be one long post… 😛

  • []Start by creating a free account at digitalsignage.com. I would recommend register with a pro account, watch few tutorials and play around and get an idea of how it works.
    [
    ]Download the studiopro on your computer
    []Login with the credentials for the account you just created
    [
    ]After a successful login, the screenshot below would be your landing page


  • []Here you will see from left to right:

    • [
    • ]Navigation pane on top, followed with a section where you’ll create your campaigns underneath.
      []Timeline pane showing you the channels you will edit, based on the screen type you create (Templates).

      • [
      • ]For example, here you see some of my clients on the left side and on the top middle of the screen you can see the timeline for one specific TV, which shows the “Output” where the screen type was created, “CH0” where I use that to have a n abstract video background, and last the “CH1”, where is the menu file for that TV. (Note: the menu is created on photoshop with a transparent background saved as a .png extension file).
        []You can view this template here. (Click on "enter full screen to view true colors. If you see white flashes between reloading, that does not show when playing live)

      [
      ]Next, below the timeline you’ll see the Toolbox pane with the resources expanded and next to it the Campaign Pane.

      • []Resources is were you upload the content you created and from there you drag it to any of the channels in the timeline. (Note: When adding a resource to the timeline, you’ll need to adjust the duration which is on the far right pane under properties. You can only adjust one at a time, you’ll have to save the project, exit the program and log back in.)
        [
        ]Campaign pane is the preview window. There you can view your project’s progress by pressing the play button located on top of the Timeline pane.
All of the above is to give you an overview of what you need to do and what it looks like. Most likely, you will need to view tutorials to create a successful campaign.
Keep in mind, this is only the part of creating the menu for 1 of your tv’s. Then you’ll have to configure the amazon player to load the menu, and you’ll have to do the same process per tv.

As far as the amazon fire tv configuration goes:
Since the new fire tv doesn’t have a USB port for sideloading applications, you’ll have to do the following:

  • []Download adb_setup.exe file from here
    [
    ]Download AutoStart_2.2.apk file from here
    []Download CloudSignagePlayer.apk file from here

Once you have these files you’ll need to do the following:

  • [
  • ]Have a bluetooth mouse to use with the fire tv
    []On your fire tv, log in with your amazon account, or if you don’t have one create new
    [
    ]Connect the fire tv wirelessly to the same network as your computer
  • Navigate to: Settings > Controllers & Bluetooth Devices > Other Bluetooth Devices > Add Bluetooth Devices and pair your Bluetooth mouse (You will need it at later steps)


  • []Next navigate to: Settings > Device > About > Network, and write down the IP Address (See Screenshot)

2018-02-01%2014_02_31-Fire%20TV%201%20-%20TeamViewer.png


  • [
  • ]Navigate back > Developer Options > ADB debugging (Set to ON) > Apps from Unknown Sources (Set to ON)
    []Next go to your computer and install the adb_setup.exe file you downloaded earlier
    [
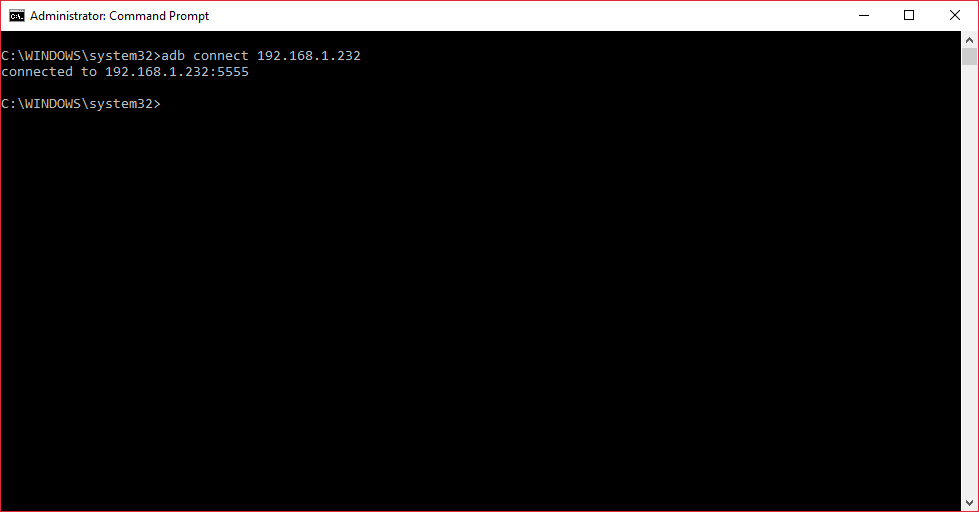
    ]After installation is complete, open the command prompt window on your computer by using right click on it and run as administrator. (If you don’t know where to find command prompt, just type “cmd” without the quotes on the search or cortana)
    []on command prompt type: adb connect (the IP Address from your fire tv) and click enter

2018-02-01%2014_32_20-Administrator_%20Command%20Prompt.png


  • [
  • ]On your fire tv check the box “Always allow from this computer” and click OK
2018-02-01%2014_32_07-Fire%20TV%201%20.png


  • []Back on your computer, find the downloaded files from earlier and while holding down the shift key on your keyboard, right click on autostart.apk and select copy as path.
    [
    ]Back at the command prompt type: adb install (paste the copied path of the file here) click enter, and wait for the installation to be completed
    []Shift + Right click on CloudSignagePlayer.apk and select copy as path.
    [
    ]Back again at the command prompt type: adb install (paste the copied path of the file here) click enter, and wait for the installation to be completed
    []Once done, go to your fire tv and navigate to: Settings > Applications > Manage Installed Applications > Auto Start > Launch Application and do the following using your bluetooth mouse:

    • [
    • ]Set application to ON
Untitled-3.png


  • []Click ADD and select SignagePlayer from the list to add it to Auto Start

Untitled-4.png


  • [
  • ]Uncheck both checkboxes on the bottom of the app
Untitled-5.png


  • []Navigate Back and scroll down to find the Signage Player App > Launch Application
    [
    ]When the application loads click connect using your bluetooth mouse
2018-02-01%2016_40_51-Fire%20TV%201%20-%20TeamViewer.png


  • []While using the mouse, click on email and use the amazon remote control to enter the email and the password you used to create your account at DigitalSignage.com

https://storage.googleapis.com/rise...018-02-01 16_41_25-Fire TV 1 - TeamViewer.png

  • [
  • ]After a successful login, select the template you want to display on that TV and click next
https://storage.googleapis.com/rise...018-02-01 17_12_36-Fire TV 1 - TeamViewer.png

  • []Click Start on the top left corner of the application window, make sure the checkbox for Update Station is checked, and click play

https://storage.googleapis.com/rise...018-02-01 17_14_28-Fire TV 1 - TeamViewer.png

  • [
  • ]It might take a couple minutes to load for the first time, but that all there is to it!
  • Voila! 🙂
https://storage.googleapis.com/rise...018-02-01 17_15_44-Fire TV 1 - TeamViewer.png
You don’t have to like the design shown here or the menu layout! Using photoshop, it gives you the freedom to design whatever you want 😉
This is just an example of what you can do with minimal cost!

Best of luck to anyone who’s willing to try!
Any other questions, feel free to ask and I’ll help in any way I can.
Going to take a break now, my fingers are tired 😛
 
Alrighty then!
Thanks for the detailed instructions but I have a feeling I’m going to mess it up 😛
 
Last edited:
Back
Top